Billing Head
Creating and Managing Billing Heads in SwilERP
In the SwilERP software, there is an option in the Masters section to create a Billing Head:
Now here you will follow the steps for creating Billing Heads in SwilERP.
- Go to the SwilERP Dashboard:
- Select the Masters > Others > Billing Head.
Reference Image:
Now, you will see the next window:-
- Select a New tab to create a new Billing Head.
- Users can
Edit/Print
, and
Delete
the existing Billing Head.
Reference Image:
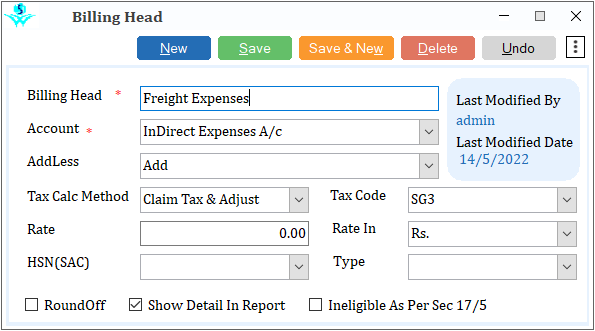
To create a Billing Head:
-
Click on the New option.
-
Now, Enter the Billing Head name that you want to create.
-
Then select the option of Add / Less ; if you want to add charges to the bill, choose Add, and select the Less option to reduce charges.
-
Select the Posting account in which you want to post this billing head.
-
If required, select the Tax Calculation method and Tax Code, which apply for the same.
-
When you select Rate in percentage (%), you will enter the value in the Rate column (otherwise, you can skip the rate column).
-
Select the HSN code , if required.
-
Select the Type in which you want to apply charges on Products, Services, and Capital Goods.
-
If required, then tick mark in the Round off check box, then amount will be round off.
-
If the user wants to view the details of billing head in the reports, tick in the check box of
Show Detail In Report.
- Tick mark on the Ineligible As per Sec 17/5 , It mean if you don't want to take input of the GST paid then you can mark on the given option.
-
Now, click on the Save tab.
Reference Image:
]